This installation guide is intended for the homeowner, contractor and commercial metal roof installer. Please read and understand the manual content before beginning your roof installation in order to ensure a trouble free installation and maintain applicable warranties. If you have any questions regarding the installation of your metal roof system, please contact Westman Steel.By using this Guide, you accept the risks and responsibilities for all losses, damages, costs and other consequences resulting directly or indirectly from using this Guide. These installation instructions are intended as suggestions, or guidelines, only. Westman Steel assumes no responsibility for the performance, or quality, of the roof system installation, nor any personal injury or damage that might occur as a result of improper installation.Westman Steel does not warrant any product or material as meeting the current building codes, laws or regulations of any particular jurisdiction or local municipality.The information provided herein was in effect at the time this publication was printed. To meet code, and the frequent associated updates, Westman Steel reserves the right to modify, without notice, any specifications and/or designs at any time without incurring any obligations. To insure you are up to date, please inquire with your local RSM, our CSR’s located at our Manufacturing facilities, or visit our web site. Application and design details are for illustrative purposes only and may not be appropriate for all environmental conditions and/or building designs. Projects should be engineered and installed to conform to applicable building codes, regulations, and accepted industry practices.
- Exposed fastener structural roof and wall panels, given the correct span and load requirements, can be installed directly over purlins or joists, or direct to deck.
- Recommended minimum roof slopes are noted on the Steel Profile page.
- Galvalume panels, or pre painted Galvalume panels, should not be used in Hog Barn applications.
- Galvalume material must not come into contact with concrete or pressure treated lumber.
- Load Tables contained herein were prepared by Dr R M Schuster P.Eng, Professor Emeritus of Structural Engineer-ing, University of Waterloo, Ontario Canada.
- All sealants shown on the details are a recommendation only by Westman Steel. Unless requested prior to ordering, Westman Steel will not supply tape sealant or caulking in quotes or cladding packages.
- Types and locations of tape sealant and tube caulking shown on the details are the best recommendation for a proper seal.
- All screw types shown on the details are the best suited fastener for each location recommended by Westman Steel.
- Screw lengths shown on the details are the standard recommended length. Different length fasteners are available and can be supplied if requested.
- All fasteners shown on the details are/can be supplied by Westman Steel.
- Panel End Lap details can be supplied but may vary based on actual site conditions.
- Hip and Valley details can be supplied but may vary based on actual site conditions. These details are to be used as a guideline only for installation.
- Ridge venting will not be assumed to be included in quotes or cladding packages. If venting is required, please notify Westman Steel prior to estimating or ordering.
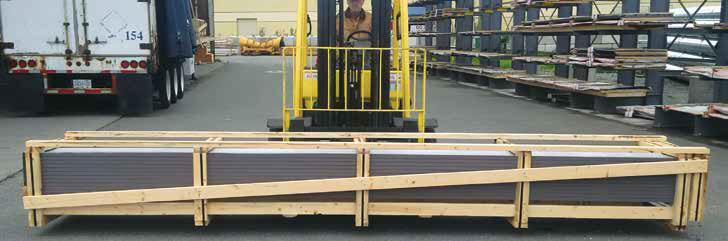
Spread forks evenly under each bundle/lift/skid/crate
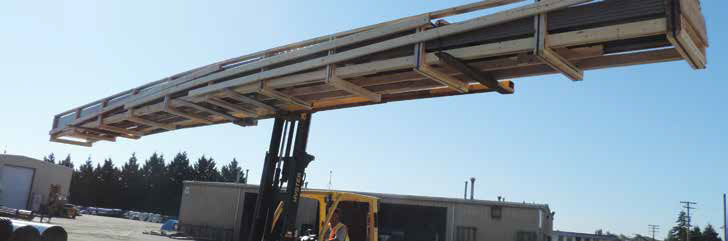
Use spreader bar with a forklift.
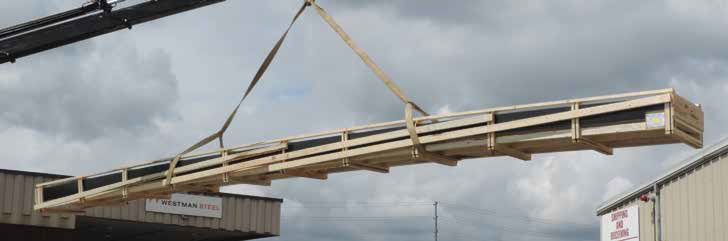
Using a nylon strap when utilizing a crane for lifting
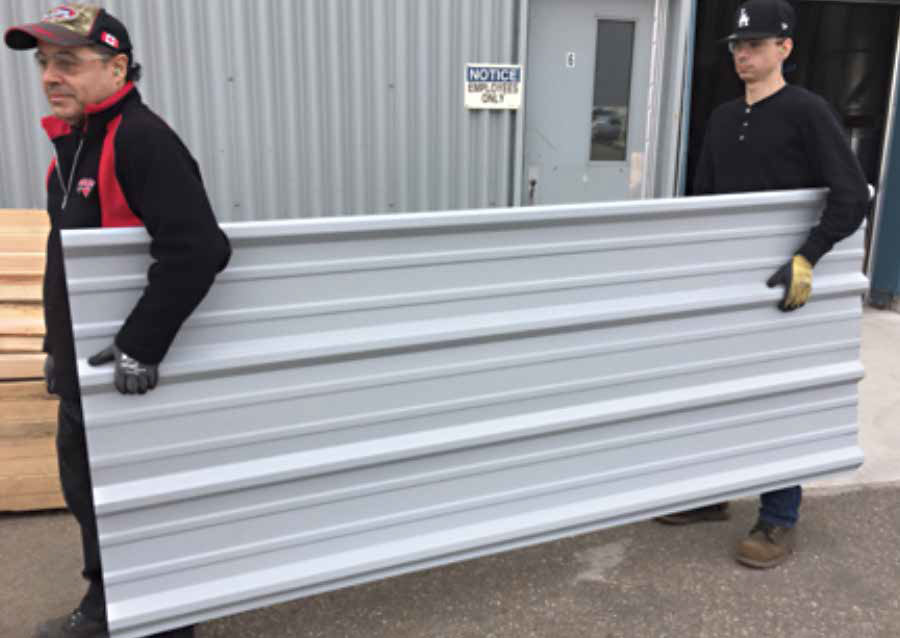
The correct way to carry a profiles sheet
- Upon receiving material, please check your Receiving Report against the Bill of Lading for shortages and damage. Please notify Westman Steel of any discrepancies as soon as possible. Westman Steel will not be responsible for shortages or damage unless they are noted on the Bills of Lading.
- Handle all bundle/lift/skid/crate’s and individual panels with care to avoid damage.
- Each bundle/lift/skid/crate is to be lifted at its centre of gravity, with your forks evenly spread as much as possible.
- If possible, each bundle/lift/skid/crate should not be opened, or un-banded, until it is staged in a convenient location adjacent to the portion of building it is being applied to. If it is to be moved, each bundle/lift/skid/crate should be re-banded prior to doing so.
- When lifting a bundle/lift/skid/crate with a crane, a spreader bar is recommended if available. Use nylon straps, and never use wire rope, or chain, as they will damage the panels.
- When moving each bundle/lift/skid/crate, please drive slowly in rough terrain to prevent the panel buckling.
- Each sheet should be lifted from its bundle/lift/skid/crate. Never drag a panel as this will cause to the next sheet.
- During installation, panels should be carried on edge to prevent buckling.
- If sheets are longer than 10’, each panel should be carried by 2 people, again on edge to prevent buckling. Add an extra person for each 10’ increment.
- Panels should never be lifted, or picked up, by the ends.
- Do not drag sheets on the ground or over each other.
- Westman Steel is not responsible for damage incurred because of improper handling.
Upon receipt of your roofing panels, store them in a well ventilated, dry location.
Rain or condensation can be drawn between the stacked sheets where it can cause premature failure of the protective coating, cause water stains, or white rust. Trapped moisture, between pre painted metal, can also cause white rust to form underneath the paint finish, causing paint blisters, or paint to flake off immediately or over time.
Do not store panels in direct contact with the ground. Ensure the panels are adequately supported and elevated off the ground, preferably with a slope to allow water to drain. Cover panels with a waterproof cover spaced off the panels to allow air movement. Never cover panels in plastic, as this will encourage condensation to form.
Prolonged storage of panels in a lift is not recommend. If longer than 4 weeks, after receipt of your order, the lift should be opened and the panels inspected.
Store panels inside if possible.
Raise one end to drain moisture, and cover with waterproof tarp while still allowing airflow.
Given the best conditions, steel will provide you with many years of “peace of mind” protection as one of the longest lasting cladding materials available.Here are a few tips for keeping your steel performing the way it’s supposed to – for years to come!
- Visually inspect your roof on a yearly basis. Things move with prolonged exposure to the elements! Check to make sure there are no holes or gaps, and that all screws are correctly installed.
- Our Paint finish, although durable, should be cleaned thoroughly, and on a yearly basis, if it is not already exposed to washing by rain. Use warm water, a little dish soap, and a soft bristled brush.
- Remove any branches, leaves, or debris that may fall on your roof. This will allow moisture to properly drain away when necessary.
- Remove, or trim back any trees and bushes etc, that will potentially be in continual contact with your steel cladding. Over time, with movement through wind and growth, these can potentially cause abrasion damage to your Paint finish.
- Some trees will emit a sap that can build up on your cladding. This will need to be cleaned periodically with warm water, dish soap, and a soft bristled brush. Otherwise, left alone, this will build up and give the appearance of discolouration.
- While most steel roofs are “walkable”, it is best to minimize foot traffic as much as possible. If you do need to get on the roof, don’t stand on the ribs, and make sure to walk where the strapping is located to avoid damage.
- Clean your gutters! Give your roof a chance to dry out. Continual contact with wet material is detrimental to your steel roof, and can lead to premature rusting and/or edge creep.
- Remember to keep different metals separate. For example, keep copper pipes from touching steel roof systems. When different types of metal come into contact with each other and eventually become wet, they will break down in a process called electrolytic corrosion
Tools and equipment, required, will vary by job, and by profile.Depending on application, you may, or may not, require some or all of the following:1. Metal shears, nibblers, power shears or circular saw with metal-cutting cutting blade. Note: Saw cut edges can be jagged, unsightly and tend to rust sooner than sheared edges. Hot metal filings are produced when saw cutting, which may embed in and damage the paint coating. Also, saw cutting burns the paint and galvanizing treatment, leading to the onset of edge rust.2. Metal snips (left edge, right edge and centerline cutting snips).3. Hem bending tool 4. Gloves and protective clothing5. Safety goggles and ear plugs (Eye and ear protection)6. Tape measure and chalk line7. Rubber mallet8. Screw gun or drill (adjustable clutch recommended)9. 1/4”, 5/16”, 3/8” sockets – must be lobular and replaced after 10,000 to 15,000 fasteners10. Drill bits, screw bits11. Pop rivet gun12. Caulking gun13. Pencils and markers14. Utility knife15. Locking sheet metal pliers16. Hammer staplers
The following is a basic step-by-step guide for the installation of Westman Steel’s steel roofing and siding.STEP 1: Material ChecklistIt is necessary to make sure all pieces are on hand before starting.Please stage your material according to roofing, side walls, end walls, sliding door sheets, trims and fasteners, and put them in a convenient location nearest to their application point. Make sure to use the correct length of sheet in the correct area and be careful to stage, or secure, sheets prior to installation from the elements, and wind, at all times. Please see storage recommendations attached.Depending on your application, some trims need to be installed before cladding, so to avoid delays please make ensure you have what you need.STEP 2: Install Roof Trim, Flashing and Westman Steel UnderlaymentThe examples of trims and flashings used in this guide are only representative of the products available, and may not be recommended in certain applications. Please call us for advice, or direction, as needed. While the use of trims/flashings are needed to ensure a weathertight building, some trims are optional and can be used to enhance appearance. The following installation instructions refer to flashings and trims that are either, in-stalled before the cladding (Before applied), or installed after the cladding (After applied). Determine which type you have purchased and follow the appropriate installation procedure.(a) Gable Trim (Before applied): To install gable trim, fit the pieces in place, fastening through (at 36” spacing maximum) both top and bottom nail-ing flanges. If this type of trim is used, it is important to properly seal (sealer tape is commonly used) and fasten the cladding sheet along the gable to prevent water from migrating under the sheet and into the building.(b) Eave Trim (Before applied): Eave trim are installed before the roof sheets. There the Eave trim will cover wall sheeting, determine the wall panel depth (e.g. 3/4”) and fasten the top nailing flange of eave trim to allow a space for the wall panels plus a 1/8” clearance. Use at least three fasteners per 10’6” length of trim.(c) Corner and Ridge Boxes (if required): Corner and ridge boxes are optional items and are installed after the eave and gable trims are in place. Follow the manufacturer’s directions.
Dormer and Valley Flashings: Where required, install the valley flashings as shown. It is important that the valley flashing be supported by sheathing or blocking along its entire length. Without this support the flashing will not lie flat and it will be impossible to make a weathertight seal between the roof sheet and the flashing. The size and shape of valley flashings differ from one roof to another. A low-pitch roof may require a 36” wide valley flashing, whereas a higher-pitch roof may only require one 24” wide. The roofing sheets should be cut at an angle to accommodate the pitch of the valley. A “W” valley is more effective in channeling water off the roof than a “V” type. Care needs to be taken to close off the cladding ribs to prevent water backing up under the sheet. Flashing where the dormer meets the main roof area can be done using Westman Steel Roof Shield, which is an EPDM dormer cap designed for this application (shown as an On-Site Flashing below). Installation details for this can be found at the back of this Installation Guide. The dormer ridge cap needs to be cut and fitted under the main roof sheets.
Membrane: When sheet steel roofing is installed over a sheathing material such as plywood, it is common practice in some regions, and some applications, to install a synthetic underlayment, or a peel and stick membrane over portions of the roof area. Please consult with your Westman Steel representative for recommendations.
STEP 3: Roof Sheets
(a) The first thing is to check the roof squareness. At the corner where an eave and gable meet, measure eight feet along the eave purlin and mark. Then measure six feet up the gable edge from the eave and make another mark.Measure the distance between the two marks. If it is exactly ten feet, you have a square roof at that corner. Check all roof corners using this procedure.
NOTE: The following instructions assume that the roof is square. If the roof is not square there are two correction methods that can be used depending upon the severity. If the deviation is not too significant, it can be corrected a little sheet by sheet taking advantage of the tolerances in the sheet side laps. For unsquared roofs, the sheet along the gable can be trimmed along its length to match. An After applied gable flashing is used to reduce the visual impact of the trimmed sheet.(b) Identify the proper seam lap and the proper screw placement to fasten the sheets to the building.
NOTE: When walking on a roof, avoid walking on the ribs. Step where the purlins are and follow the fasteners up or across.
(c) To get the roof sheets up on the roof, put a board or ladder against the fascia board and slope to ground as far away from the building as possible. Using vise grips and a rope, pull sheets up the board and onto the roof. This method is not suited to long sheets.
NOTE: Extra care needs to be taken on windy days to prevent the sheet from buckling or getting out of hand. Work safely.
(d) Start at the eave on the end of the building farthest away from the prevailing winds. Extend the sheet about 1” over gable edge and 1” to 2” over the eave.
Overlap sheet ends by at least 6”. Sheet end overlaps should only be made at a purlin for support. Lay sheets one by one from eave to ridge before commencing second row (below). Do not fasten open side before starting next row. Except for large buildings, a single sheet will span from eave to ridge without requiring overlaps.(f) Check sheet alignment every four to five rows by chalking a line square to the eave.
(g) Leave the required space at the ridge to accommodate ventilation requirements.
STEP 4: Install Ridge Cap
There are a number of ridge cap and venting options. When venting, enough space must be left at the top of the roof sheeting allowing a sufficient opening as specified by the manufacturer.
(a) Chalk location of ridge cap on both sides of roof.
(b) Install closure strips/vented closure strips depending on application along chalk line with adhesive.
(c) Place ridge cap, or vents/vented ridge cap, on top and fasten through top of cladding rib and through closure strip. For vents/vented ridge cap, please make sure that closures do not block any drainage holes.
(d) For standard ridge cap, caulk overlapping portion and place next ridge cap on top, repeating the above steps.
(e) For vents and vented ridge cap, they should be fastened through the ribs of the roof sheets and a generous bead of caulking must be applied between the ridge cover and the vent end flanges.) For a ridge longer than the length of a single vent (normally 10 feet) butt two vents together with the connector flange underneath at the joint. Both vent and end panels fit between the two tabs on the connector flange. End panels are used when vents are installed individually.
STEP 5: Gable Trim (After applied)
Certain Gable trim are installed after the roof sheets have been installed. If you are using this type of trim, it should be installed as per details attached.
STEP 6: Install Base Flashing
(a) Measure side wall sheeting length and add 1” to determine location of base flashing.
(b) Measure nailing flange of base flashing.
(c) Subtract (b) from (a).
(d) Using the measurement found in (c), chalk a line around the building.
(e) Install base flashing, matching the top of the nailing flange to the chalk line. Using fasteners every 24”, fasten trim.
STEP 7:
Other Wall Trims and Flashings
Depending upon the type of building, there are a number of other flashings and trims needed to close off around the various wall penetrations such as doors and windows. The following describes some of the more common types as shown in the details following. Here again, some wall flashings and trims are installed before the wall cladding while others are installed after the cladding. Make sure you know which type you are using.
(a) Inside Corner: available for before and after applied applications.
(b) Outside Corner: available for before and after applied applications. Other options may be available. Please inquire.
(c) Gable Divider: Installed after the end wall siding, but before the gable siding. A gable divider is not needed if the end wall sheets are cut to fit the slope of the roof.
(d) Jamb Flashing: Jamb flashing is used around door openings and installed before the wall siding.
(e) J Trim: Finishing around a door, trimming windows, or being used as a termination strip on wall panels, J trim can be used in a multitude of different applications.
(f) Drip Flashing: Can be used over doors and windows, or as a base and header trim.
STEP 8: Wall Sheeting
Install the side wall and end wall sheeting, beginning on the side opposite primary view, usually the rear wall of the building. This will produce the best appearance since the sheeting laps will be out of immediate view.
(a) Inside Corner: available for before and after applied applications.
(b) Identify the proper seam lap and the proper screw placement to fasten the sheets to the building.
(c) Begin placing sheeting on the side wall at the corner. It is very important to use a level to plumb the wall sheets before fastening.
(d) Check seam lap to ensure a snug fit.
(e) Run the first two fasteners through the girt to hold the sheet in place.
(f) Finish fastening the wall sheets using the proper screw placement, ensuring that the sheets are square and laid evenly.
(g) Continue to fasten the wall sheets around the building, finishing with the gable ends.
STEP 9: Caulking and Clean-up
(a) Caulk around windows and doors for that professional look.
(b) After the cladding sheets are installed, take a soft bristle broom and sweep the sheets to remove any steel shavings or other dirt.
(c) Steel particles left on the cladding will rust very quickly, often staining the paint finish, giving the impression that the roof sheet has rusted.
(d) Dirt left on the sheets will hold moisture and accelerate the deterioration of the paint system